
背景
前情報などはこちらを参照してください。
概要
本記事の内容に関しては未検証の部分や私が理解できていない点があるため、随時更新されることがあります。ご容赦ください。
proxmox VE 8.3 のVMに、docker を使った traefik リバースプロキシサーバを立てます。
OSは Rocky Linux 9.5
VMに割り振っているIPは 192.168.1.7 とします。
仮想マシンのメモリは1GB、プロセッサは2コアを与えています。
SSL化にCloudflareを使う前提です。
dockerの導入
まず、Dockerリポジトリを追加してインストールします。
[root@localhost ~]# dnf install -y yum-utils
[root@localhost ~]# dnf config-manager --add-repo=https://download.docker.com/linux/centos/docker-ce.repo
[root@localhost ~]# dnf install -y docker-ce docker-ce-cli containerd.io docker-compose-plugin
自動起動の構成と起動
[root@localhost ~]# systemctl start docker;systemctl enable dockertraefikの導入
traefik用のディレクトリを作ります。
dockerのデータは /etc/docker/ に置くのが通例(?)のようなので、/etc/docker/traefik を作成します。
[root@localhost ~]# mkdir /etc/docker/traefikdocker-compose.ymlを作成します。
Let’s Encryptで設定しようとした形跡が残っていますが、Cloudflareからの脱却の際に備えてコメントアウトで残しています。
[root@localhost ~]# vim /etc/docker/traefik/docker-compose.ymlservices:
traefik:
image: traefik:latest
container_name: traefik
restart: always
ports:
- "80:80"
- "443:443/tcp"
- "8080:8080"
environment:
#TZ: Asia/Tokyo
# For Cloudflare auth
- CLOUDFLARE_EMAIL=${CF_EMAIL}
- CLOUDFLARE_API_KEY=${CF_TOKEN}
labels:
traefik.enable: true
# ダッシュボードWebUIの設定
traefik.http.routers.dashboard.rule: Host(`traefik.local`)
traefik.http.routers.dashboard.entrypoints: websecure
traefik.http.routers.dashboard.service: api@internal
# httpでアクセスしたらhttpsにリダイレクトする設定
traefik.http.routers.http-catchall.rule: hostregexp(`{host:.+}`)
traefik.http.routers.http-catchall.entrypoints: web
traefik.http.routers.http-catchall.middlewares: redirect-to-https@docker
traefik.http.middlewares.redirect-to-https.redirectscheme.scheme: https
traefik.http.middlewares.redirect-to-https.redirectscheme.permanent: true
command:
- --certificatesresolvers.letsencrypt.acme.dnschallenge=true
- --certificatesresolvers.letsencrypt.acme.dnschallenge.provider=cloudflare
- --certificatesresolvers.letsencrypt.acme.email=${CA_EMAIL}
- --certificatesresolvers.letsencrypt.acme.storage=/letsencrypt/acme.json
- --certificatesresolvers.letsencrypt.acme.keyType=EC384
volumes:
- /var/run/docker.sock:/var/run/docker.sock:ro
- ./traefik.yml:/etc/traefik/traefik.yml:ro
- ./external.yml:/etc/traefik/external.yml:ro
- ./ssl:/ssl:ro
#- ./ssl/cyane.info.pem:/ssl/cynae.info.pem:ro
#- ./ssl/cyane.info.key:/ssl/cyane.info.key:ro
#- ./letsencrypt:/letsencrypt
networks:
- tfnet
networks:
tfnet:
driver: bridge環境変数(CF_EMAILやCF_TOKEN)を外部から参照するようにしているので、同じディレクトリに .env を作り、パラメータを設定します。
[root@localhost ~]# vim /etc/docker/traefik/.envHOST=cyane.info
[email protected]
[email protected]
CF_TOKEN=****************************************CF_TOKENの取得方法
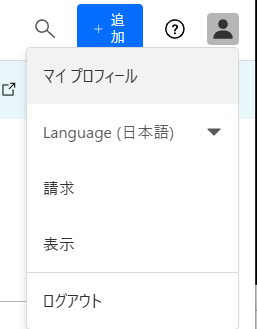
Cloudflareのサイトにログインし、右上のアカウントアイコンから「マイプロフィール」
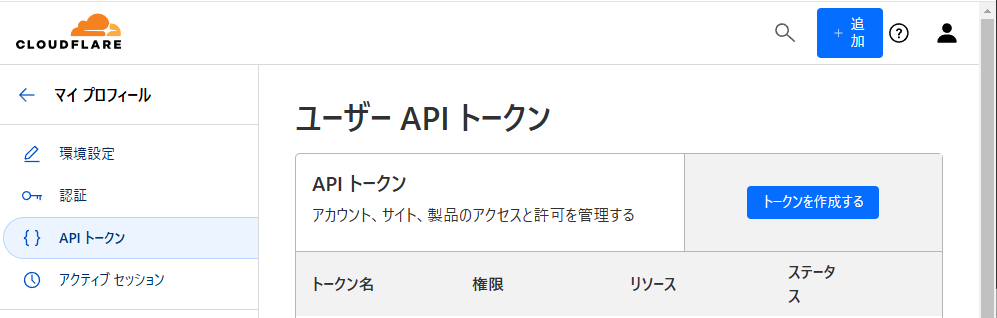
左側の「APIトークン」メニューから、「トークンを作成する」
TODO:必要な権限は未検証
とりあえずカスタムで全リソースの読み取りを許可したものを作成。
traefikの設定
[root@localhost traefik]# vim /etc/docker/traefik/traefik.yml# "web"というエントリポイント名でTCP80番ポートで受け付ける
entryPoints:
web:
address: ":80"
#http:
#redirections:
# entryPoint:
# to: websecure
# scheme: https
websecure:
address: ":443"
# websecureではTLS接続を終端させる
http:
tls: true
# Traefikダッシュボードの設定
api:
insecure: true # falseにするとAPIが非公開になる
dashboard: true
# どのサービスを検知するかを設定
providers:
# dockerとの連携を有効
docker:
# trueにするとTraefikと同じネットーワークにあるコンテナは何でも検知されてしまうのでfalseが一般的らしい
exposedByDefault: false
network: tfnet
# fileプロバイダーの有効化
file:
filename: /etc/traefik/external.yml
#tls:
# entryPoints: websecure外部ファイルの設定
[root@localhost traefik]# vim /etc/docker/traefik/external.ymlhttp:
routers:
www:
rule: Host(`www.cyane.info`)
entrypoints: web,websecure
service: www
ddrcoterie:
rule: Host(`ddrcoterie.cyane.info`)
entrypoints: web
service: www
services:
www:
loadBalancer:
servers:
- url: http://192.168.1.7/
# TRAEFIL DEFAULT CERT を使うので以下はコメントアウト
# Cloudflare TLSのフル設定の場合は、Cloudflare-Origin間の証明書はオレオレで良いのでtraefikに任せる
#tls:
#certificates:
# - certFile: "/ssl/cyane.info.pem"
# keyFile: "/ssl/cyane.info.key"
# 上記サーバー証明書に一致しないドメインは以下が使われる。
# (未設定だとTraefikが自動で作る)
#stores:
# default:
# defaultCertificate:
# certFile: /ssl/cyane.info.pem
# keyFile: /ssl/cyane.info.key起動
デーモンモードで起動
[root@localhost traefik]# cd /etx/docker/traefik
[root@localhost traefik]# docker compose up -d
その他ノウハウ
アップグレードして再起動する
[root@localhost traefik]# docker compose pull && docker compose up -ddockerイメージの一覧表示
[root@localhost traefik]# docker images未使用のDockerイメージをクリーンアップする
[root@localhost traefik]# docker image prune